From Fabric to Final Piece: Journey from Scatch to Showroom
Introduction
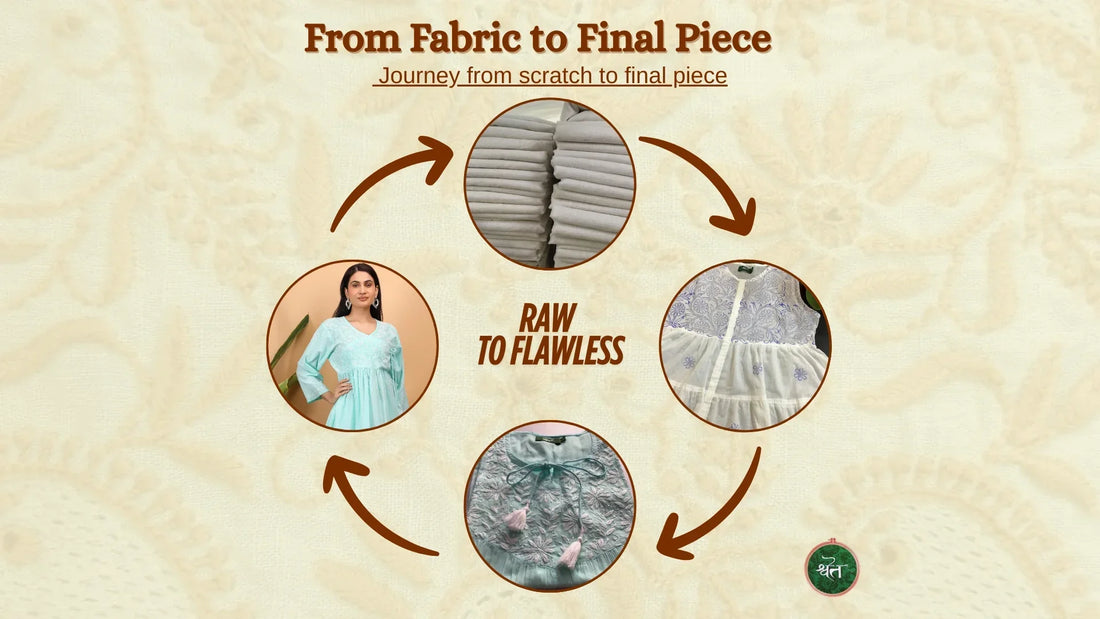
Have you ever wondered how a simple bolt of fabric transforms into a garment you cherish? We believe that sharing each step of our journey—from choosing the cloth to delivering a carefully inspected final piece—builds trust and highlights the dedication woven into every stitch. Below is our production story in a warm, conversational tone, ready for you to copy, paste, and adapt as needed.
1. Raw Cloth Selection: Where It All Begins
Every great garment starts with the right fabric. We begin by feeling and inspecting each bolt under natural light, looking for an even weave, consistent shade, and freedom from snags or flaws. We often choose breathable, lightweight textiles like cotton lawn or muslin, which drape beautifully and stand up to printing and embroidery without puckering. Working with suppliers who share our commitment to fair labor and sustainable practices is essential—knowing that each roll of fabric comes from responsible sources gives us confidence that the foundation of our garments is strong and ethical.

2. Cutting: Shaping the Future Garment
Once the fabric is approved, it moves to cutting. Here, flat cloth becomes panels hinting at the final form. We lay pattern pieces onto the fabric, aligning grain lines and positioning motifs so that prints or embroidery will sit correctly later. Optimizing the layout not only ensures a pleasing design but also minimizes waste. Skilled cutters then follow these outlines with precision, be it with rotary cutters and scissors in smaller batches or under close supervision in larger setups. As each panel is cut, it’s labeled with style and size, marking its path to the next stage.
3. Preliminary Stitching: Building Stability
Before adding prints or embroidery, we sometimes stabilize panels through stay-stitching and basting. Stay-stitching along edges prevents stretching of lightweight fabrics, while basting can hold layers—such as interfacings or linings—in place. In cases where motifs must align across seams, we might baste front and back panels at the shoulders, creating a basic shell that helps designers preview placement. These careful preparations ensure that when the creative stages arrive, the fabric behaves predictably and panels remain organized for their intended treatments.
4. Printing: Applying the Design
Next comes printing, when patterns are applied to the fabric panels. Depending on the design and scale, we choose among block printing, screen printing, or digital printing. For small-batch, artisanal runs, block printing offers a handcrafted character: wooden blocks dipped in pigment are pressed onto fabric or semi-assembled shells. For larger quantities or multi-color motifs, screen printing allows consistent results, sometimes requiring partially assembled panels so the print aligns across seams. Digital printing handles complex artwork with precision on fabrics suited to digital inks. Before committing, we test on swatches to confirm that inks hold up through future stages like embroidery or dyeing. Once printed, panels undergo careful drying or curing, handled gently to avoid smudges or uneven results.
5. Embroidery: Adding the Human Touch
With printed or plain panels in hand, we move to embroidery—the moment when skilled hands bring depth and texture. Panels are secured in hoops or frames, and artisans transfer motifs via printed guides, chalk lines, or washable markers. Stitch choices depend on design: outlines might use running stitches or chain stitches; fills may involve satin stitches or specialized techniques like shadow work. Thread types—cotton, silk, metallic—are selected to complement prints or fabric color. When multiple layers of stitches or colors are needed, lighter under-stitches come first, followed by deeper or accent layers. Embroidery takes time and concentration; artisans check tension regularly to keep the fabric smooth, correcting any irregularity immediately. As each motif evolves stitch by stitch, the garment truly begins to feel special.
6. Dyeing : Coloring the Assembled Piece
Some designs call for dyeing after embroidery, adding tonal or gradient effects. This requires extra care since embroidery threads must remain colorfast. We always run swatch tests combining the exact fabric and thread types to ensure the dye bath won’t bleed threads or distort stitches. For immersion dyeing, the assembled piece is gently submerged and stirred, taking care not to stress embroidered areas. For tie-dye or dip-dye effects, we protect or embrace embroidered sections depending on the look. After dyeing, garments are rinsed thoroughly and shade-dried flat or lightly draped, monitoring embroidery for any tension changes. This optional stage adds a unique flair but only after confident testing.
7. Finishing: The Subtle Enhancements
Once all creative treatments are complete, we move to finishing touches that refine look and feel. Some fabrics benefit from a gentle softening wash or enzyme treatment to improve hand feel. If a protective coating—like light water resistance—is part of the design, we first test on swatches to ensure no adverse effects. Loose threads are trimmed carefully, and any residual chalk or basting marks are removed. Edge details, such as fringe or raw edges, are tidied or sealed to prevent unraveling. Finally, labels—size, brand, care instructions—and sometimes an artisan-credit tag or note are sewn in, placed thoughtfully so they don’t interfere with decorative areas. These subtle enhancements ensure the garment looks polished and feels delightful to wear.
8. Ironing / Pressing: Presenting with Care
Ironing is where the garment’s silhouette is set and wrinkles vanish. We select the correct temperature for the fabric and press embroidered sections from the reverse side with a thin protective cloth overlay, preserving stitch texture and thread integrity. Light steam can ease stubborn creases, but we avoid over-steaming near embroidery. Pressing along seams and darts defines shape, often using tools like a tailor’s ham to maintain curves without flattening motifs. Each press is deliberate—too much heat or pressure can diminish the handcrafted details—so this stage is approached with patience and precision.

9. Quality Control: Ensuring Every Detail Shines
Before declaring a garment “final,” it undergoes a thorough quality control process. Under bright, even lighting, we examine overall appearance: are prints crisp, embroidery consistent, dye uniform? We look closely for stray threads, uneven stitches, or color irregularities. Next, we measure each piece against a spec sheet—bust, length, sleeve measurements—to confirm size accuracy. Functional tests follow: seams are gently tugged to test strength; buttons and zippers are tried; embroidered areas are checked so threads don’t snag. For color-sensitive items, we may run a small wash or swab test to verify colorfastness. Minor issues get reworked—loose threads restitched, small spots corrected, pressing redone—while any major flaws lead to setting the piece aside. A record of inspection results, with dates and actions taken, helps us maintain consistency and identify areas for improvement in future batches.
10. Final Product: Ready to Delight
Having passed quality control, the garment is complete and ready for packaging, marketing, and shipping. We fold or hang each piece carefully, wrapping it in recycled tissue or placing it in biodegradable packaging, accompanied by a care instruction card and, if part of our story, an artisan-credit note sharing a glimpse of the hands behind the work. The final piece is then photographed on mannequins or models in natural light, capturing details, drape, and any special features—these images feed product pages, lookbooks, and social channels. In our inventory system, SKU, size, and batch information are recorded, and shipping labels printed with tracking details, sometimes including a handwritten thank-you note. We invite customers to share photos or reviews once they receive their garment; their feedback may reveal fresh insights that inform and refine our process further.